Key Takeaways
- Know your own abilities, whether you are comfortable working with electricity and if you have the necessary tools before choosing DIY or a pro.
- Make sure your ceiling and electrical setup can support and power the fan safely.
- Check local building codes and observe safety precautions to be in line with regulations and avoid accidents.
- Calculate the overall costs of both options, factoring in any hidden expenses or future savings.
- Think about your schedule, the difficulty of the installation, and if you have the time and materials to execute the project correctly.
- Plan for ongoing maintenance and explore additional features to maximize the efficiency and functionality of your ceiling fan.
Ceiling fan installation requires careful planning, the correct tools, and safe procedures. Knowing what you’re in for before you begin saves time and money.
Important factors to consider include ceiling height, wiring, and fan weight. These safety rules are important whether you DIY or hire a pro. Both carry expenses and procedures to consider.
Knowing these fundamentals guides you in choosing the optimal path and steering clear of common errors. The following sections provide additional information for every step.
Decision Factors
Ceiling fan installation is more than just putting up a new fixture. It’s a job that mixes security, art, price, and time. These decision factors can shift the scales on whether DIY or hiring a pro works best for your home and needs.
1. Your Skillset
Safe fan installation involves knowing how to handle wires, use a voltage tester, and read wiring diagrams. If you can’t distinguish a live wire from a neutral wire, the potential for shock increases. Handling screwdrivers, pliers, and wire strippers is elementary yet essential.
Even if you’re drill-savvy, the wiring can get tricky, particularly if you’re dealing with switches or dimmers. The decision factors indicate that following the step-by-step manual is not optional. Skipping a step can make the fan wobble or spark.
If you can’t figure out, say, a humming motor or flickering lights, DIY is probably not your friend.
2. Structural Integrity
Because ceiling fans are heavier than regular light fixtures, not all ceiling joists will support them. Always make sure your joist is sound and your box is rated for ceiling fans. If you use a standard junction box, not the heavy ones marked for fans, it could come loose and then your fan falls.
Extra support in the form of a brace will be required for any bigger or heavier fans. If your ceiling cracks or has water damage, installation may cause deterioration or be hazardous.
3. Electrical Reality
Wiring a ceiling fan usually entails more than just changing light fixtures. Fans might require a dedicated circuit, particularly for older homes. Complicated wiring, such as double switches or remotes, can confuse amateurs.
Local building codes can require permits, and they’re different in every country, so it’s easy to overlook a regulation if you’re not current. Bad connections lead to shorts or fires; therefore, correct wiring is mandatory. Pros know these codes and how to test connections for safety.
4. Time Commitment
DIY can consume an afternoon or more. A pro often gets done in an hour. Unanticipated issues such as miswired switches or missing parts increase the time.
Once underway, research and prep can extend the project, particularly for newbies. Think if you have the time and patience, as haste makes expensive errors.
5. Tool Arsenal
You’re going to need a ladder, screwdrivers, wire strippers, and pliers. Lacking the proper tools leads to delays and additional trips to the hardware store. Just wear safety gear, like gloves and goggles, to avoid being cut or shocked.
A few enthusiasts require additional equipment, such as stud finders or customized mounting brackets, for challenging installs. Having a checklist before you begin helps keep things on track.
The DIY Path
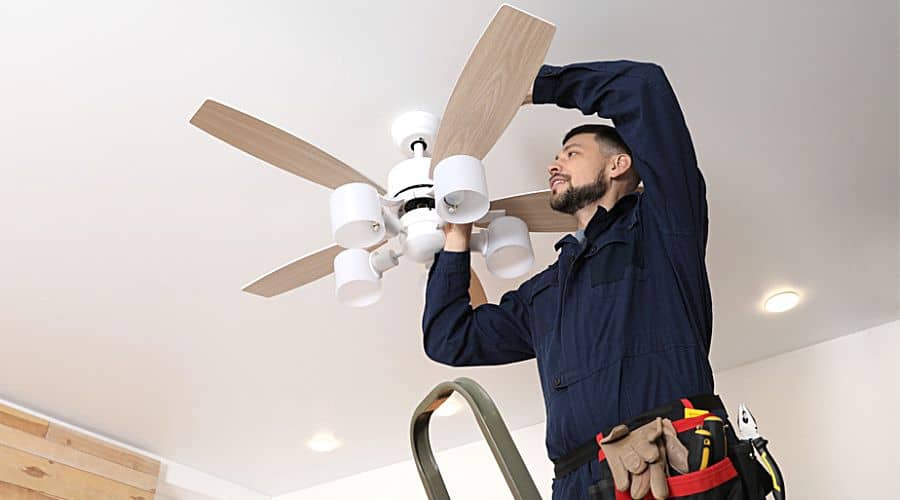
Installing a ceiling fan is attractive to the hands-on homeowner or DIYer who wants to save on labor costs or simply likes working at his or her own pace. DIY can save $100 to $300 per fan since you’re only paying for the fan, which typically costs $50 to $150. Still, this route isn’t always straightforward, particularly if you’ve never done home electrical work before.
Ceiling fan installation usually requires a duo: one to hold the fan and another to connect wires or attach mounting brackets. This is even more the case for bigger, heavier fans or when working on scaffolding. Safety is important in any DIY project, and installing a ceiling fan is no exception. Before you begin, shut off the power at the circuit breaker and verify with a voltage tester that there’s no current.
Be certain the junction box is rated for ceiling fans, as ordinary boxes aren’t designed to hold the weight or motion of a fan. If your box isn’t the right kind or if you’re feeling unsure about the wiring, it’s time to dial a pro. DIY installs can take hours, particularly if you have special mounts, high ceilings, or additional wiring steps. It might be slower for a novice, but it’s an education and a point of pride when completed.
Step-by-step instructions can help make the process less daunting:
- Gather all tools: screwdriver, pliers, wire strippers, ladder, voltage tester, and safety gear.
- Flip the power off at the breaker and test with a voltage tester.
- Detach the initial fixture and make sure the junction box is fan rated.
- Assemble the fan parts as per the manual.
- Attach the mounting bracket to the junction box.
- Wire up the fan according to the instructions, matching wire colors.
- Attach the fan to the mounting bracket using all screws.
- Attach blades and light kit, if included.
- Restore power and test the fan for proper function.
- Adjust settings and check for wobbling.
Lots of online content, including step-by-step video tutorials, can visually decompose the process and demystify tricky steps. They usually illustrate what to anticipate with standard ceiling types, wiring colors, and mounting types. Community forums are great for hands-on advice, troubleshooting, and tips from other DIYers who have been there before.
Snap pictures or take notes along the way and this will be useful to remind you of wire placement or mounting steps should problems arise further along. A well-installed ceiling fan can keep any room cooler and more energy-efficient for years, DIY or pro-mounted.
The Professional Route
Hiring a professional for ceiling fan installation is the safer, more reliable option for most homes and businesses. A master electrician provides expertise and years of experience, reducing the hazards associated with this work yourself approach. Pros understand what to look for and how to address issues, such as outdated or fragile junction boxes, preemptively.
They know local codes, so the work will be up to snuff safety-wise. That translates to less risk of electrocution or fire, something that’s a major worry with ceiling work. For complicated tasks, such as high ceilings, bulky fans or intertwined wiring, a professional does it quickly and without hassle.
Making the installer aware of your needs and wants helps get the right result. You can discuss your room size, ceiling height and what type of fan you’d like. A good pro will inquire about airflow, lighting requirements and switch placement.
This results in a configuration that complements your lifestyle and protects you. If you have a specialty ceiling type or desire for remote, bring it up early. The installer can then prepare for the appropriate components and tools.
Unlike the do-it-yourself approach, most electricians will warranty their work, which is reassuring. In other words, if something breaks, the pro returns to repair it free of charge during the warranty period. I’d ask about the warranty and what it covers—wiring, the fan, labor.
Some may provide a year, while others may offer a longer period. This becomes useful if the fan begins to rattle down the road. Professional installation is pricier than DIY, ranging from $100 to $300, depending on the size and wiring requirements.
This is a more expensive initial investment, but it may be cheaper in the long run. The price is simple to estimate, and you eliminate additional costs from errors, such as broken hardware or a damaged ceiling. A pro can complete the work in around an hour, while DIY installs run the risk of taking many hours, particularly if you’re new to electrical work.
Our professional installers arrive with the proper tools, adhere to all safety measures, and clean up when they’re done. They balance your fan and make it work effectively. You get it done right the first time, with less stress to you.
Cost Breakdown
Ceiling fan installation pricing can range widely depending on if you do it yourself or hire a pro. The fan unit itself begins at $89 and escalates from there based on style, size, and brand. Accessories such as controls, remotes, or receivers add another $30 to $100. If your ceiling is high or sloped, a longer downrod can run $10 to $75 and an angled ceiling mount will add around $37. For sloped ceilings over 34 degrees, you’ll need a sloped ceiling adapter, which increases the price further.
| Installation Type | Approximate Cost (USD) | What’s Included |
|---|---|---|
| DIY | $89–$200+ (plus tools and extras) | Fan unit, basic tools, some accessories |
| Professional | $200–$600+ (including labor) | Fan unit, pro labor, wiring, accessories |
DIY may look less expensive on paper, but there are costs that creep. Unless you already own a ladder, drill or wire strippers, you’ll need to purchase or borrow them. That can tack on an extra $30 to $100 or more to your estimate. If wiring isn’t already in place, bringing in an electrician to pull new lines will run a minimum of $210 and can frequently cost more in tricky situations.
Just adding a wall control or an extra remote can add another $30 to $100. These hidden costs can nudge the DIY price tag toward that of what you’d pay a pro, particularly if you require special parts for a vaulted or sloped ceiling.
When you hire a pro, you pay for expertise and comfort. Electricians’ labor rates run the gamut, with the majority charging between $60 and $250 per hour. Easy gigs, such as replacing an outdated fan, typically run lower in price. More difficult installs, such as including a fan where there’s no wiring or working with high vaulted ceilings, may last longer and are more expensive.
Cost breakdown: always request a specific quote pre-work and verify exactly what’s covered. Certain pros bill you extra for mounting hardware, new wiring, or handling unusual ceiling angles. It’s wise to get a couple quotes from different licensed electricians or installation services.
See what’s covered; some may cover the cost of small parts, some may not. Inquire about guarantees or after support, particularly if your fan has intelligence or requires additional wiring. Review research will help you locate the greatest value, not simply the cheapest price.
A good installation can save you money in the long run. A well-installed ceiling fan can help trim energy bills by increasing airflow, so you can run your A/C less. If a pro does the job right, you are less likely to have wobbling fans or bad wiring or repairs down the line, which ultimately saves money and stress.
Safety & Compliance
Ceiling fan installation requires specific procedures and obvious inspections to ensure your work is secure and complies with local building codes. Screwups here can cause actual hazards, such as accidents, shocks, or even fires, so it’s a good idea to understand the fundamentals before you dive in or bring in someone to take care of things.
Every home and country has its building codes for electrical work, so those must be checked before any tools come out. They’re not just there for fun; these codes are there to keep everyone safe and bypassing them can mean fines or hassle later on.
Below is a quick guide that lists the main safety steps and ways to stay in line with rules:
| Safety Precaution | Compliance Measure | Example/Explanation |
|---|---|---|
| Turn off power at the source | Follow local electrical code | Shut off the circuit breaker to avoid shocks |
| Use a rated junction box | Check box weight/stress rating | Use a box marked for ceiling fans, not just lights |
| Secure mounting bracket | Use the right hardware and tools | Make sure bracket is tight and can hold the fan’s weight |
| Double-check wiring | Use correct wire connection techniques | Match wires by color, use wire nuts, and avoid loose ends |
| Inspect installation | Regularly check for loose screws/wires | Look for wear, strange noises, or wobble after set up |
| Ask for help | Have another person assist when lifting | Fans are heavy and awkward—lifting alone can lead to falls or damage |
| Use stable ladders/tools | Comply with height and access guidelines | Use a ladder that fits the ceiling height safely |
Knowledge of local building codes is essential, wherever you live. These regulations go beyond mere wiring. They specify how far a fan needs to be from walls, how high above the floor, typically 2.1 meters or higher, and what sort of junction box is permitted.
Codes vary by country, city, and even neighborhood, so it’s best to check with local authorities or websites before work begins. Proper mounting makes a big difference. The fan should be secured to a fan bracket and fan box rated for its weight.
A major risk is using the wrong box or loose screws which can cause the fan to fall. If you have a high ceiling, a sloped ceiling, or a heavy fan, the task might be too much to handle on your own. In these instances, it’s best to bring in a licensed electrician or installer.
Pros know the tips for hard installs and will ensure your fan is secure, balanced and does not stress your wiring. Regular inspections count even post-installation. Listen for rattling, watch for wiggling or any areas of wear. These checks can identify problems before they spiral into bigger issues.
Beyond Installation
More than just a fixture, a ceiling fan. Installed right, it can cool a room, save energy and add comfort for years. What happens after you install it is just as important as the initial installation.
Schedule maintenance to keep your ceiling fan running smooth. Dust on the blades will weigh the fan down and disperse dirt throughout the room. To keep the blades clean, wipe them every few weeks with a soft cloth. Inspect the screws and mounting bracket for tightness a minimum of twice a year. A loose fan can vibrate and prematurely fail.
Oil the motor if your fan requires it. Some newer fans are sealed, but the old types can run dry and noisy. If you notice strange noises, flashing lights, or a wobble, repair it quickly. Small problems can escalate and could even cause a fire or electric shock.
Go beyond installation. A lot of the newer fans have lights built into them, which not only frees up space but reduces additional fixtures. Seek out LEDs to save even more power. Remote controls become standard, allowing you to adjust speed and lighting without leaving your chair, which becomes very helpful in rooms with high ceilings.
A few ceiling fans will even work with smart home systems. This allows you to schedule or adjust settings from your phone. If you have kids or elderly people in your home, then touchless controls or wall-mounted remotes can make things safer and simpler.
Go beyond installation. In summer, have the fan spin counterclockwise to push cool air down. This allows you to crank up your AC by 1 or 2 degrees Celsius and still feel cool, saving you cash. Most fans have a switch to reverse direction in winter. This circulates cool air upwards and warm air down, potentially heating your space more efficiently and reducing your heating bill.
Not all fans have this option, but it is worth checking pre-purchase. Get the low-down on new ceiling fan designs and tech. Fans come in so many styles, colors, and materials now. There is one for every room and palate.
Others incorporate quieter motors, energy-efficient blades, or intelligent sensors that decelerate or halt the fan when the room is unoccupied. Watch for these enhancements, as they can increase both style and utility. If your fan is out-of-date, a new one can transform the mood of an entire room.
Conclusion
To choose the right route for your ceiling fan installation, evaluate your tools, know-how and what codes you need to abide by. DIY suits those who feel confident with home repairs and want to save a few bucks. A pro can provide a timely job and ensure compliance with all codes, which translates to safety and peace of mind. Either way will require you to consider price, timing, and little add-ons like smart controls or balance kits. Most people discover they like a combination, perhaps doing some of the prep work and leaving the wiring to the professional. Consult local regulations, read and consult with others who have installed them. For your next move, contact a reputable electrician or search tutorials for your own project.
Frequently Asked Questions
What tools are needed for DIY ceiling fan installation?
You’ll need a ladder, screwdriver, pliers, wire stripper, voltage tester, and maybe a drill. Be sure to turn off the power before you get started.
Can I install a ceiling fan where a light fixture was?
Yes, but make sure the electrical box is ceiling fan rated. Fan-rated boxes can support the additional weight and movement.
How much does professional ceiling fan installation cost?
Professional installation can run anywhere from $50 to $200 per fan depending on location and difficulty.
Are permits required for ceiling fan installation?
Most jurisdictions don’t require permits to swap out a fixture for a fan. Check your local electrical codes, just to be safe.
Is it safe to install a ceiling fan myself?
It’s safe if you follow the instructions and basic electrical safety. If you’re not certain, it’s safer to hire a professional.
What are the benefits of hiring a professional?
A pro can make sure everything is safe, properly mounted, and up to code. This minimizes the risk of mishaps or later electrical issues.
How do I choose the right size ceiling fan for a room?
Determine the square meter area of your room. For areas up to 13 m², choose a fan with a blade span of 76 to 91 cm. Bigger rooms require bigger fans.