Key Takeaways
- Evaluate your installation space, ceiling support, and power sources ahead of a no wiring ceiling fan project.
- Make sure you have solid structural support. Find the ceiling joists or put in braces. Confirm the ceiling can support the fan’s weight.
- Select a suitable power source. Determine whether a new circuit or an existing circuit can support your ceiling fan and plan for convenient switches.
- Wiring includes running new circuits, using the existing wiring, and surface wiring where concealed wiring is unfeasible.
- Even with our step-by-step safety and installation tips, turn off power, secure the box, and double-check connections!
- Think about employing a professional electrician for hard-core installs and consistently follow neighborhood codes and permit requirements for dependable operation.
Ceiling fan installation no wiring refers to installing a ceiling fan where there is no outlet or wiring in the ceiling. It usually requires running new wires from a close source, installing a junction box, and installing controls.
Most homes should get this upgrade, especially some of the older buildings. The key steps, safety tips, and typical challenges are addressed in the main sections below.
Project Assessment
Ceiling fan installation without wiring is a multi-step project that requires a cautious process. Evaluating the space, foundation, electric options, and DIY versus pro is crucial. Every choice impacts budget, security, and outcome.
Structural Support
Locate ceiling joists close to your fan location. These sturdy beams attach a hanging fixture. Strike these points with a stud finder. Not every ceiling spot is suitable for fans.
The selected location must be able to hold a minimum of 23 kilograms (50 pounds), which is what fan-rated boxes are rated to withstand. If the fan is heavy or if the original ceiling box is not fan-rated, mount a brace to distribute the weight.
Braces are metal bars that fit between joists and provide additional strength. This is important in older homes or when installing a heavier model. Don’t overlook ventilation and coziness.
Position the fan such that air can circulate freely in the room, not back against walls or obstructions. Be careful not to have low-hanging fixtures in high-traffic walkways. Even in small rooms, the proper placement enhances comfort and fan efficiency.
Power Source
Verify what power options are in the ceiling. A lot of older homes aren’t wired for ceiling fans, so you might have to run a new line from the breaker box. This step can push your costs as high as two thousand dollars, particularly if you need to design a new circuit for safety and code reasons.
Survey existing circuits. If one in the room is already near its load limit, putting a fan on could trip breakers or even pose fire risks. Your breaker box must have a free slot in case you need to add a circuit.
Always turn off the electricity before doing any wiring work. Think of how to harness the fan wall switches, although some fans have remotes. They both require wiring schematics.
Costs accrue with more complicated wiring, and a typical installation might run between $300 and $800, well beyond the price of a simple fan install.
DIY or Pro?
DIY can save money. However, electrical work is dangerous. Mishaps can short-circuit or ignite. Unless you have some serious wiring under your belt, you’re best off calling a licensed electrician.
A pro knows building codes, how to size wiring and mount the fan. They provide expertise on challenging projects, particularly when there’s no wiring or a new circuit is necessary. This can drive prices to over $1,000 as well.
Ask your local Mr. Electric or equivalent if you’re in doubt. They can consult, provide quotes, or perform the work, which safeguards your residence and sanity.
Wiring Solutions
Putting up a ceiling fan in a bedroom with no wiring for a light fixture means you usually have to snake one up to the ceiling. You have a few options ranging from installing a special circuit, retrofitting an existing one, or doing surface wiring. The correct method is dictated by your room layout, budget, and local electrical codes.
Ensuring the ceiling fan is grounded and supported by a listed fan-rated junction box is key.
New Circuit
| Circuit Layout Type | Requirements | Typical Use |
|---|---|---|
| Dedicated Fan Circuit | New wires, fan-rated box, wall switch, breaker | High-load fans |
| Shared Lighting Circuit | Tap into existing lighting, check capacity | Small rooms |
| Multi-location Switch | 3-way switch wiring, multiple switches | Large spaces |
A new circuit involves wiring, typically 14/2 and 14/3, a fan-rated box costing between $10 and $25, connectors, a switch, and a compatible breaker. Secure mounting is key. The fan must attach directly to a ceiling joist with screws or use a brace kit that spans two joists.
NEC is the best plan to follow, but check with your local code for any revisions before you begin. Work with the power off. Take a voltage tester before you grab any wires.
Run 14/2 from the service panel to the switch and 14/3 from the switch to the fan box. Connect black to black (hot), white to white (neutral), and green or bare copper to ground.
Existing Circuit
Check the load rating of any circuit you intend to use! While most ceiling fans consume 50 to 75 watts, introducing one to a circuit that’s already close to overload might push it over the limit. Test safety with a circuit tester.
Look for tight wire connections. Mark the fan circuit in the breaker box. If you experience flickering lights or tripped breakers post-installation, reexamine your load calculation.
Surface Wiring
Surface wiring allows you to route wires across walls using raceways, which is beneficial for concrete ceilings or finished walls. For safety and style, select low-profile raceways with coordinating colors.
Determine the wire run so it will not cross a heavy traffic area or interfere with a door. Secure raceways with screws or glue. For wiring, leave enough slack for connections but not loose wires.
Be extra careful of any sharp bends which may incur wire strain.
Alternative Fans
Plug-in ceiling fans and battery fans sidestep hard wiring altogether. These work well for renters or rooms where wiring isn’t feasible. The majority of plug-in models employ a typical outlet, and battery-powered units work well for smaller spaces or temporary arrangements.
Some are more energy efficient than others. Plug-in fans tend to run on less power than battery fans. Just be sure to check airflow ratings and noise levels.
Set portable fans where they won’t obstruct paths and keep cords out of kids’ reach. Know that other fans may not blow as much air or operate as long as wired ceiling fans. They’re handy, but they don’t have the power of a ceiling fan.
The Installation Guide
It’s difficult to install a ceiling fan when there’s no wiring in place. It demands strategic design, proper implements, and rigorous precision. It can take hours, and professional assistance might run between $300 and $800 depending on the layout of your home.
Before starting, gather all tools and materials: a fan-rated electrical box, 14/2 or 12/2 electrical cable, wire nuts, electrical tape, cable staples, a stud finder, a sturdy ladder, gloves, and eye protection. Keeping a record of your progress assists you in not losing your way or missing a step.
1. Safety First
Turn off power at the breaker to eliminate any danger of shock. Strap on gloves and goggles to protect your hands and eyes from dust, sharp wire, and debris. Stand on a solid ladder that is flat on the ground, with no boxes or chairs.
A clean work area free of debris or open tools helps you concentrate and reduces the risk of stumbles.
2. Route Planning
Figure out the cable path from your power source to the fan’s location, trying to minimize opening up walls or ceilings. Trace where you’ll drill holes for the electrical box with a stud finder identifying ceiling joists for solid support.
Keep airflow in mind: the fan should be at least 7 feet above the floor and 18 inches from any wall for best use and safety. Create a checklist for every step. It keeps the project flow-oriented and prevents details from slipping through.
3. Box Installation
Employ a fan-rated electrical box, after all standard boxes can’t hold fans safely. The box must be locked to a ceiling joist or to a brace kit that extends between joists. Opt for screws or bolts that won’t loosen.
Make sure the box is square and level because an off-kilter box will cause your swing to shake or squeak.
4. Running Cable
Run the new cable from the breaker panel or nearest power source to the fan’s location, being careful not to puncture walls or ceilings. Fish tape directs the wire through tight areas and steers you clear of snags.
Staple or clip the cable every 1.2 meters. Allow some slack at both ends for convenient hookups to outlets and the fan.
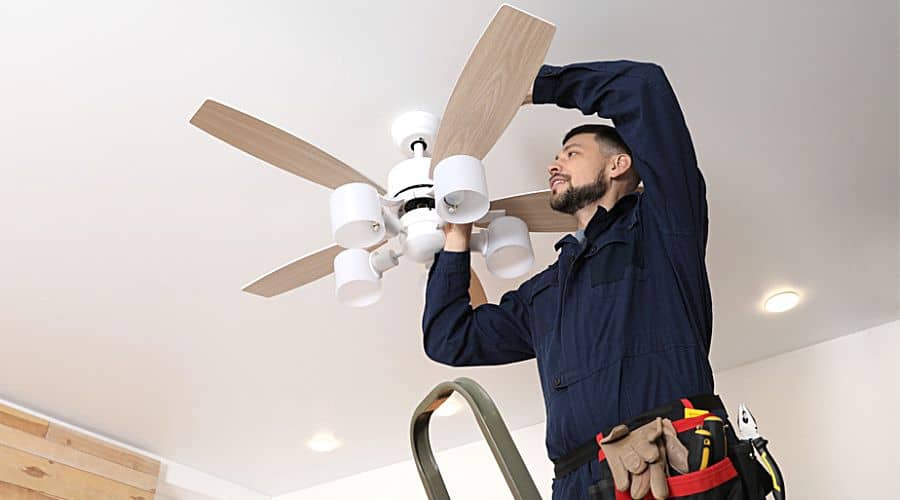
5. Fan Assembly
Consult the manual to assemble the fan body, motor, and blades. Secure blades firmly to prevent shaking or noise during operation. Make sure all the screws and bolts are tight.
Test the fan’s motor and lights prior to final mounting to save time readjusting once everything is complete.
6. Final Connections
Match the wires: black to black (hot), white to white (neutral), and green or bare copper to ground. Twist wire nuts on each connection and wrap with electrical tape.
Check all connections and ensure that they are tight and correct. Flip the breaker on, then test each fan speed and light. That can be switched with a wall switch, remote, or smart control, with each setup requiring its own wiring steps.
Codes and Permits
Unwired ceiling fan installation – Tips to keep it legal and safe. Most jurisdictions, including Glendora, La Verne and San Dimas, base their standards for what is safe on the National Electrical Code (NEC). Local building codes generally follow the NEC, but some areas establish their own additional regulations. Before beginning, stop by your local building office.
Certain cities require permits for every electrical task, even if you simply install a ceiling fan. A permit is typical if the job involves accessing or modifying your house’s electrical system. Even if your home is your own, you may need to obtain a permit prior to working. Skipping this step can lead to fines or difficulty selling your home down the road.
| Permit Type | Typical Code or Standard | Example Requirement |
|---|---|---|
| Electrical Permit | NEC, Local Code | Needed for new wiring, must be inspected |
| Building Permit | Local Code | Sometimes needed for structural work (cutting joists) |
| Inspection Approval | NEC, Local Code | Inspector may check wiring type and junction box |
Safety is a primary objective of these codes. For instance, the NEC states you need to utilize a fan-rated junction box. This box is sturdier than a light fixture box and can support at least 23 kg (50 pounds). Certain areas will even specify what size wire you require, such as 12-2 NM cable.
If you neglect these precautions or employ substandard materials, you expose yourself not only to fines but to the dangers of fire or tumbling ceiling fans. Some won’t even let you do electrical work unless you’re a licensed electrician. Even if you can DIY it, it’s smart to see if you need to bring in a pro. It’s not just about obeying the law; it’s about protecting your home.
Price is another consideration. Permits and licensed electricians add up. The ceiling fan installation with new wiring can easily cost between $300 and $800 or more depending on local wages and permit fees. It’s smart to budget for these expenses from the outset. Then you don’t get surprised by additional steps or invoices down the road.
Professional Services
Ceiling fan installation with no wiring is a task that frequently requires professional intervention. Professional electricians take care of additional measures such as installing new wiring, making openings in ceilings, and securing fans to joists. These steps, in addition to being time consuming, demand rigorous adherence to safety codes to avoid dangers.
For homes with ancient or nonexistent wiring, bringing in a pro means the job is done right the first time. It bypasses later issues such as loose mounts or electrical shorts.
When to Hire
- Do’s
- Get a licensed electrician to do all your new wiring.
- Request evidence of their experience with ceiling fan work.
- Talk wiring plans and code before any work begins.
- Ask for references or past client reviews.
- Get the contractor to give you a firm written estimate.
- Don’ts.
- Try complicated wiring if you’re inexperienced.
- Assume every electrician is a ceiling fan installer.
- Neglect the requirements for fan-rated junction boxes.
- Circumvent safety or code requirements.
If your ceilings are high or rooms are thick plaster, pros have the right tools and ladders. Tricky circuits, like adding on or replacing outdated panels, are safer with them.
Now consider your own abilities. If you don’t know how to run wiring or install junction boxes, it’s safer to hire a professional. It reduces anxiety and frees up time, allowing you to concentrate on other things.
The Process
Professional installation is typically several steps. Once you select your fan, the electrician will map out where to run wiring and mount the fan. This could entail cutting into the ceiling and installing a fan-rated junction box, which is required for support.
Fans can weigh 7 to 23 kilograms, so the box must cope with both weight and motion. Before work starts, discuss the schedule and any specific requirements.
Tell your electrician your ceiling height, fan type and if you’d like additional controls like wall switches or remotes. Tell the electrician to use safety procedures and equipment and adhere to local electrical codes.
In the end, request a walkthrough. Make sure switches operate, the fan is secure and all wiring is tidy.
Cost Factors
- Labor and callout fees
- Complexity of running new wiring
- Ceiling height or access issues
- Fan type and weight
- Need for a new circuit or breaker
- Cost of fan-rated junction box and extra hardware
- Required permits or inspections
A basic fan install begins at $145 to $355. In the absence of wiring, prices increase and typically run anywhere from $300 to $800. For older homes requiring a new circuit, you’re looking at costs of $1,000 or more.
Always get several quotes to compare, whether permits or additional materials are included in the price.
The Unseen Costs
There’s more to hanging a ceiling fan where there’s no wiring than the price of the fan itself. A lot of individuals just view the sticker price on the box, but the reality extends way beyond that, particularly if you desire a secure and durable configuration. The additional processes required typically imply more time, more equipment, and more expertise.
Permits and code checks is one big reason. Local regulations might require a permit before work can begin, increasing the time and cost. Others have limitations on wiring or ceiling mounts. Not adhering can result in fines or rework. These permits aren’t free and the paperwork can bog things down.
Wiring is another large chunk. If there’s not already a power up at the ceiling, someone has to run new wires. That can translate to what is essentially tear downs — breaking into walls and ceilings, snaking wires through crawl spaces and generally ensuring that everything is up to code. Just wiring, for example, can begin at $210 and escalate with intricacy.
If you require a fan-rated box to hold the weight, that’s an additional cost. The entire install can total $400 to $1,000 or more, particularly with hard-to-access areas or older structures. Labor is a big chunk of the budget. Electricians bill by the hour, with fees ranging from $60 to $250.
The easy job may require only an hour, but most require two or more, particularly if the ceiling is vaulted or the wiring is outdated. For vaulted or sloped ceilings in your home, a sloped ceiling adapter may be required. This only adds roughly $37, but the true leap is from additional labor and equipment, meaning the total approaches $300 to $900 or more in certain instances.
Specialty installs, like heavy or smart fans, or those in tough spots, can push the price even higher, at $1,200 or more. Accessories such as remote controls, wall switches, or smart receivers can add an additional $30 to $100, and some fans require these to be fully functional. All these details accumulate quickly and are simple to overlook when you’re scheming.
Energy costs follow. Fans don’t consume as much energy as AC units, but operating them throughout the day and night during hot or cold times of the year will definitely make their presence known on the electricity bill. The right fan can help trim cooling or heating expenses by moving air more, but not all are created equal.
Energy-efficient models might be worth the higher upfront cost if they bring down bills. Maintenance completes the invisible expenses. Dusting blades, checking mounts and fixing wobbles or strange noises keeps the fan safe and quiet. It can translate to more minor expenses over the years.
Conclusion
To install a ceiling fan in a room that doesn’t have existing wiring, clean prep and proper procedure are key. Wiring takes craftsmanship. Local codes ensure that the work remains safe and legal. Hiring a pro keeps the job smooth and minimizes risk. It’s easy for those initial expenses to accumulate, but a secure, comfortable space remains worth the effort. Nearly any house can install a fan, but every installation is its own adventure. Prefer less stress and fewer surprises? Review room layouts, understand the codes, and consult a pro. For more tips or to find a local expert, check trusted sites or ask neighbors who did the same. Keep cool in every room, safely.
Frequently Asked Questions
Can I install a ceiling fan without existing wiring?
Yes, you really can. You’ll have to install new wiring and perhaps a junction box. This typically involves opening up the ceiling and wiring to a power source. It’s best to hire a good electrician.
Do I need a permit to install a ceiling fan without existing wiring?
In most jurisdictions, you need a permit to install new wiring. Consult your local building code or local authority on this to be safe.
How much does it cost to install a ceiling fan without existing wiring?
It depends on the size of the room, how complicated the wiring is, and how high your local labor rates are. All in all, anticipate spending between 150 and 400 USD, fan not included. There might be extra fees for permits or hard installs.
Are there risks to installing a ceiling fan without professional help?
Yes, electrical work is dangerous if it’s not done correctly. Incorrect installation can cause electrical fires, shock, or damage. A licensed electrician ensures safety and compliance with code.
What wiring solutions are available for rooms without ceiling wiring?
You could always run new wires from a nearby source, or use surface-mounted conduit, or install a wall switch. Either way, whatever solution you pick needs to be up to the local electrical codes and installed by a professional.
What should I consider before starting this project?
Consider your ceiling configuration, power access, and local codes. Determine a plan for the fan, switches, and wiring routes. Safety and permits come first.
Will a ceiling fan installation affect my home’s resale value?
A professionally installed ceiling fan is not only more comfortable but more appealing, potentially increasing resale value. Make sure any work is up to code and documented for future buyers.